When it comes to accounting software for small to mid-sized businesses in the U.S., QuickBooks has reigned supreme for more than four decades.
With the introduction of cloud-based functionality and robust financial management features, the more modern evolution of QuickBooks Online has become a fan-favorite for today’s business owners — and QuickBooks Commerce, the recently introduced eCommerce adjacent platform for online retailers, has also steadily gained traction.
Like QuickBooks Online and the older adaptations that came before it, QuickBooks Commerce syncs with existing eCommerce data. There are several steps that eCommerce business owners will want to take to ensure they get the most bang for their buck (and the most accurate finances).
In this post, we’re sharing what you should know to set up QuickBooks Commerce correctly.
👉 Bonus: Download our free Quickbooks ecommerce toolkit here.
Article Contents
Getting started with QuickBooks Commerce
QuickBooks Commerce is the latest iteration of the cloud-based inventory and order management platform. It combines the traditional accounting capabilities of QuickBooks Online with more advanced eCommerce-focused features, such as the ability to manage sales channels, create purchase orders, invoice vendors, and monitor inventory all from one streamlined dashboard.
Formerly TradeGecko, QuickBooks Commerce integrates eCommerce business management tools with standard accounting practices, such as employee payroll, receipt capture, tax deductions, and of course, performance reports.
With a QuickBooks Commerce subscription, eCommerce retailers can easily keep their finger on the pulse of operations from anywhere with a WiFi connection.
QuickBooks Commerce Pricing
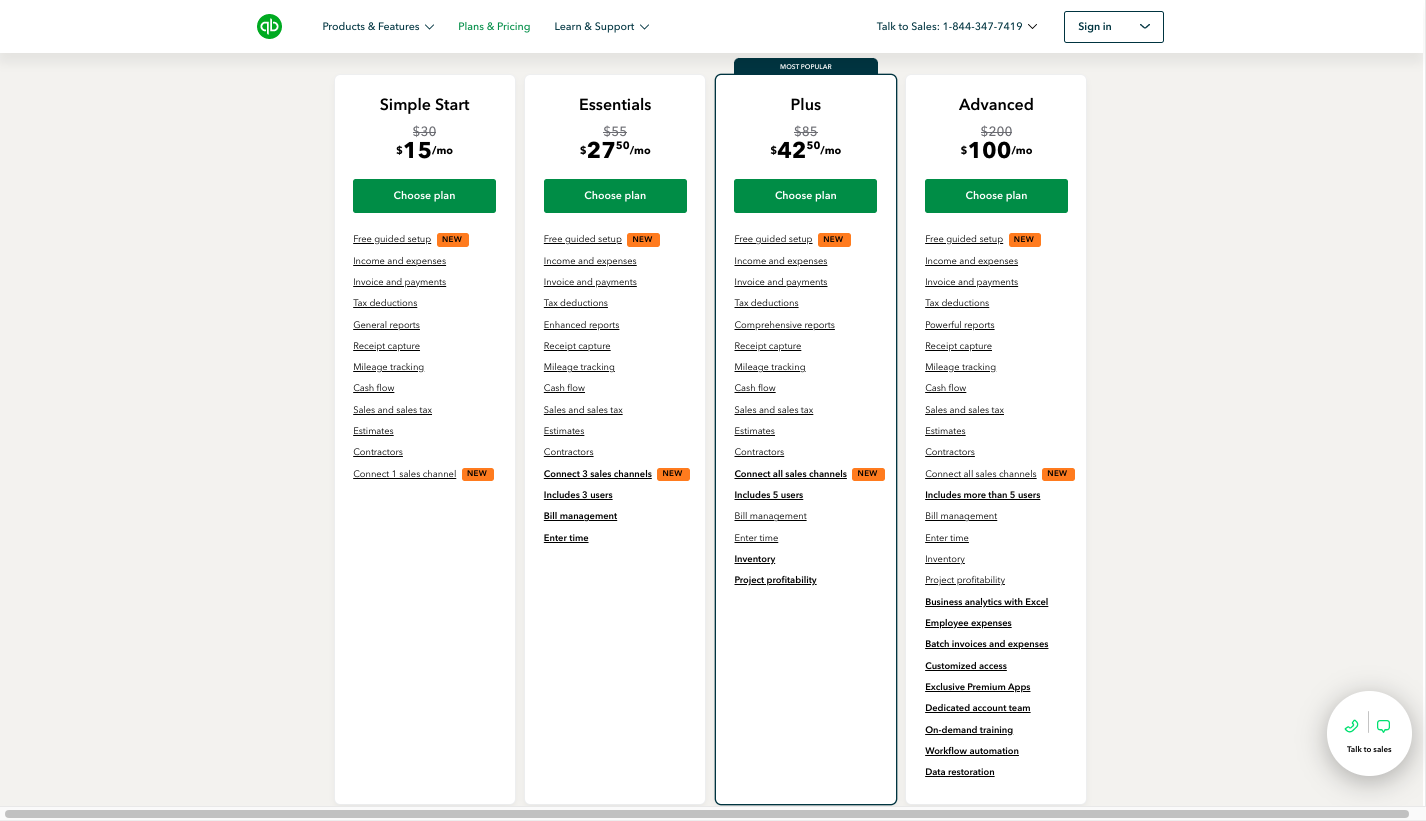
To crack into the capabilities of QuickBooks Commerce, eCommerce business owners must first understand the available pricing tiers for QuickBooks Online. The four tiers — Simple Start, Essentials, Plus, and Advanced — will come preloaded with a collection of QuickBooks accounting tools, such as income and expense management, tax deductions, and performance reporting.
However, as the QuickBooks tiers increase in price, users will also gain more QuickBooks Commerce features. For example, the Simple Start plan allows users to connect only one sales channel at the price of $15 per month, whereas the Essentials plan allows users to connect three sales channels, includes three user accounts, and offers bill management for $27 per month.
For eCommerce business owners with a more robust workflow, the Plus plan allows for unlimited sales channels and five user accounts as well as bill management, inventory management, and project profitability capabilities for $42 per month. The most expensive Advanced plan includes all the above features, upwards of five user accounts, and advanced features like business analytics, employee expense management, and customizable access control for $100 per month.
How to set up QuickBooks for the first time
Here are the key things to think about when setting up your QuickBooks Commerce account.
Connect your bank accounts
From company bank accounts to business credit cards, connecting your multiple financial accounts to QuickBooks Commerce is the key to complete expense and income management.
Sync transactions from Stripe, Shopify, etc.
Once you’ve connected your credit and bank accounts to your QuickBooks Commerce account, it’s wise to also sync the transactional data from your varying sales channels. While QuickBooks Commerce is ideal for all eCommerce owners, users can only sync transactional data from a handful of sales channels — including Shopify, eBay, and Amazon — directly from the dashboard.
To sync transactional data from one of these three sales channels, sign into your QuickBooks Online account as the company admin and select Commerce from the left-hand menu. You should then select Connect a sales channel, choose either Shopify, eBay, or Amazon, and hit Get Started. From here, you will be asked to select the dates from which you would like to sync your sales data.
There are historical data limits from each provider, which are 12 months for Shopify, 90 days for eBay, and 90 days for Amazon.
While a direct sync of transactional data may be helpful as you initially launch and scale your business; we’ve found that things get problematic at scale, therefore, you will need to use a tool like A2X from the QuickBooks App Store to sync your transaction data. A2X will assist to reconcile the payouts sent from your sales channel for your completed orders across your numerous payment processors (like Stripe & PayPal). The total amount of each payout will include the sales amount, all discounts/refunds, expenses, and adjustments for the orders in the payout period and easily matched to the deposits in your bank account.
Set up invoicing
Now that both accounts and transaction data have been input into QuickBooks Online, the set-up process can move along to invoicing.
You can either manually produce customer invoices or allow QuickBooks to automatically generate one based on the existing order information in the platform.
Set up your Chart of Accounts
A Chart of Accounts is how you can categorize your sales and expenses, which is helpful for managing profitability and cash flow, and assessing financial performance in real-time.
To ensure complete visibility over your eCommerce finances — and avoid any missed data that could impact overall reporting accuracy — follow these Chart of Accounts management tips:
- Keep your books up-to-date to ensure all bank and credit accounts are synced, all receipts have been uploaded, and all transactions are assigned to the correct account.
- Do not mix personal and business bank accounts, as it becomes extremely difficult to differentiate personal expenses and income from business financial data.
- Reconcile your accounts each month with the help of an accountant to ensure each of your QuickBooks accounts matches up to your bank statements.
- Use easily identifiable account and sub-account names to help streamline your bookkeeping efforts and simplify your accountant’s account reconciliation.
- Limit user access to avoid costly errors and security concerns.
Configure your key reports
There are three key financial reports for business owners to assess performance, including profit and loss statements (P&Ls) to understand monthly revenue and expenses, cash flow statements to understand the amount of money entering and leaving the business, and balance sheets to outline the company’s current assets, liabilities, and equity.
Configure account/user permissions
If your eCommerce business has multiple employees and vendors who require account access, it’s crucial that you configure account and user permissions when in the early stages of setting up QuickBooks Commerce.
QuickBooks allows a primary account admin to add users, manage their roles, and limit their access to certain tasks in an effort to increase the security of sensitive company data.
While company admins have complete control over the platform, setting up a new standard user will allow the primary admins to restrict them to certain parts of the platform, such as inventory or pending sales orders.
Add third-party apps to your account
With hundreds of QuickBooks apps to choose from, you may be wondering what’s best for eCommerce operations. Below are the top three eCommerce app picks to consider.
A2X
As one of the leading QuickBooks accounting plugins, A2X makes accounting automation simple. A2X allows users to sync their sales transactions and fees from channels, like Shopify and Amazon, with their Quickbooks account.
Gusto
Gusto streamlines and automates many payroll processes, including federal, state, and local tax filings as well as W-2s. Once integrated, Gusto will pull eCommerce company and employee data to streamline the setup process, which includes syncing payroll with your expenses.
When payroll is run, corrected, or updated, your altered wages, taxes, and reimbursements will instantly appear within your QuickBooks expenses.
Avalara
Avalara AvaTax offers an automated sales tax calculator for over 13,000 tax jurisdictions and keeps up with changes in tax rules, rates, and boundaries to help ensure eCommerce companies remain in compliance. Avalara AvaTax first validates a customer’s address to accurately determine the sales tax amount for you and then automatically attaches it to each QuickBooks invoice for completely accurate accounting.
***
Whether you are looking for help getting your Quickbooks account set up or need regular eCommerce bookkeeping support, our team at Bean Ninjas is here to help. Schedule a free call here.